
Hyperlapse Tutorial
In this tutorial, I will cover the process of shooting the Hyperlapse technique, the part where I explain the Post Production, will come in a future blog. Follow my social media to don't miss it!
WHAT'S AN HYPERLAPSE
An Hyperlapse is a TimeLapse technique which gained popularity in 2010, thanks to Russian Filmmakers, Zweizwei and Sasha Aleksandrov. The difference from a normal TimeLapse is simple, instead of leaving the camera in the same position or using a motorised slider, the photographer is manually moving the camera between each shot to create a long motion and dynamic video.
THE GEAR
There are a few ways to make an Hyperlapse, the main difference is basically where the camera sits, this can be on a Monopod, a Tripod, your Hand or a Gimbal.
In my opinion, the easiest way is to use a monopod or handheld, but if you are trying for the first time I would recommend starting with the monopod to get familiar with the technique. The downside of shooting with a monopod or handheld is that you can't create motion blur which requires a longer exposure.
A gimbal is very useful if you want to create an hyperlapse moving forward or backwards giving the feeling of walking through the streets. Using a gimbal is way faster than using a tripod and easier to stabilise in After Effects.
To shoot a 'Side Hyperlapse' (Left to Right movement or Vice Versa) I prefer using a tripod, it gives you more control over the movement, you can follow a path with the legs on the floor and it allows you to shoot long exposure, adding motion blur which makes everything looks much better.
THE SHOOT
So now that you have decided what 'base' you are gonna use, I am going to explain how I am actually going to shoot an Hyperlapse.

First of all, shooting a good Hyperlapse requires time, so be patient and focused, and do not rush it. Making a mistake in the middle of the shoot is a pain in the ars, as you will need to start all over again. (It has happened to me so many times).
I plan an Hyperlapse shoot as I would plan a Timelapse shoot, so if you want to know how I do it, make sure to check my last tutorial here, where I explain in detail what are my steps.
When arriving at the location and I have already in mind what's my subject, a nice building, for example, I check a few things before starting shooting:
The floor, the building, the path and the movement.
- THE FLOOR: It would make the shoot much easier if the floor has a pattern, so I am normally looking for tiles, if I am happy with them, they will be my 'step references', otherwise, depending on the distance I would use my feet as a reference.
- THE BUILDING: Next step is to look at the building and find a good point to fix your frame, normally a square, like a window, a door or a corner of the building.
- THE PATH: Now that I have my reference point on the building and I know how much I will move every shot, I would find a straight line and start walking looking at the building, checking the path of the Hyperlapse, how long I want the movement last and most important I look for obstacles like street lights, signs, street artists, trees etc.
- THE MOVEMENT: So, my path is free of obstacles and I have a start and an ending point, now I take a test shot to plan my movement, I normally take 4/5 shoots, one at the beginning and two at 3/4 on my path and the last at the end, always framing that square I chose on the building. I review the images and if I am happy, I start shooting.
SETTINGS
- CAMERA: The best settings would be as, for a normal Timelapse, everything in Manual and AF and Image Stabilisation turned off. However, if you are shooting with a monopod or handheld, therefore, a fast shutter speed, turning On the Image Stabilisation can actually help.
Always shoot in Raw for flexibility in post-production. Set the White Balance on sunlight, clouds or a custom, never leave the WB on Auto, it will take a few hours to fix it later.
- INTERVAL: The interval between shots is normally longer than a traditional TimeLapse, as you need time to move and frame every time. On a sunny day and a shutter speed of 1 sec, my interval would be 6/7 sec.
If you are trying for the first time give a 15s of interval,
An intervalometer is not actually necessary to shoot Hyperlapse, you can press the shutter on the camera or on remote control, better if there are no clouds in the sky, which require smooth movement thanks to a uniform interval.
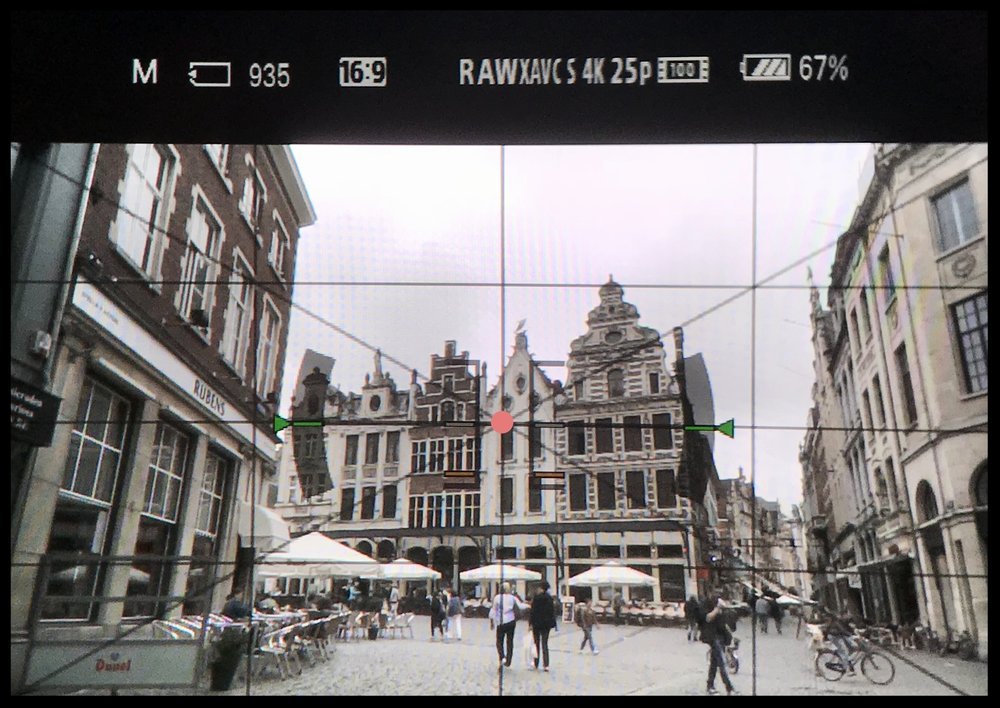
- FRAMING: As explained before, one way to frame is to look for a square object, like windows, doors or corners to find a fix-point. I turn on the live view on the camera and set the grid on my screen and then I use a corner of the grid to overlap the corner of the fix-point, trying to get the same shot for the entire Hyperlapse. Also, turn on the level on your camera, this will help to keep the camera level all the time.
You don't always need a fixed point, sometimes I look at street lines, or follow a straight line on the floor with the tripod legs, without panning the camera.
- STEPS DISTANCE: The distance between shots depends on how long you are moving and how big is your subject. For instance, If I am shooting a bridge and I travel 300m, my distance between shots would be 15/20cm, If I shoot a building and travel 20m, I would move 4cm for every shot. Once I made a 2km Hyperlapse and move 50cm for each shot. I love smooth and relaxed motion, so I preferred the steps as close as possible.
EXAMPLES
Here you can find some of the shooting examples I personally made and explain my step by step my moves.
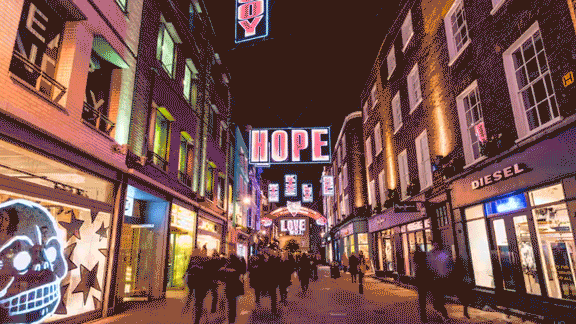
Example Nº1 - CARNABY STREET HYPERLAPSE
Gear: Sony A7rII - Manfrotto BeFree Carbon Fibre - Canon 16-35 f/4L - Twin 1 ISR Intervalometer
Planning: I knew very well this location as I have filmed it many times, the difference this time was the Christmas decorations, which were the focus of this shot. To make all the lights pop up, I went after sunset, so the Christmas decorations were perfectly lit.
Shoot: When I arrived at the location I walked up and down the street several times to check the environment and look for any obstacles. The sign HOPE got my attention, it was in the middle of the street and surrounded by other smaller signs. I then looked down at the floor to find any pattern, luckily, it was a cobbled street which was perfect to follow.
My frame was focused on the HOPE sign, a nice square object, that was my fixed point, as you might see in the example below. I set my tripod to get a longer exposure and started to manually press the remote control every 5/6 seconds.
The camera settings were f/4 - 1s - 400 ISO - Raw - All Manual
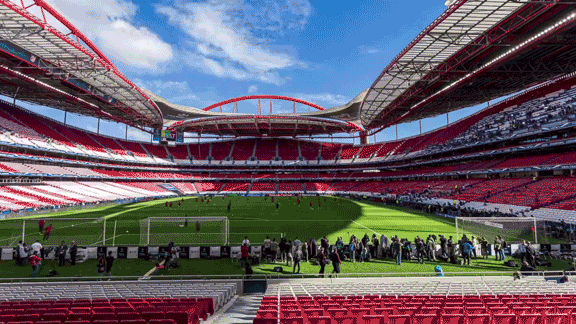
Example Nº2 - Football STADIUM
Gear: Canon 6D - Manfrotto BeFree Carbon Fibre - Canon 16-35 f/4L - Twin 1 ISR Intervalometer
Planning: There wasn't any plan here honestly, I was on a commission job for FORD covering the Champion's League final in Lisbon a few years ago and I got asked to shoot an Hyperlapse inside the stadium, I looked around for a few minutes and this idea popped up.
Shoot: For this shot, I decided to focus on the football goal on the other side of the field, to perfectly frame it I zoomed in on my camera screen. I then check how I could move and realised that the seats were perfectly aligned. On this occasion, I use a monopod, which gave me more mobility through the seat space. I plugged my Intervalometer and set it to 8sec, to get a regular interval and avoid jumps on the clouds.
The camera settings were f/8 - 1/250 - 100 ISO - Raw - All Manual
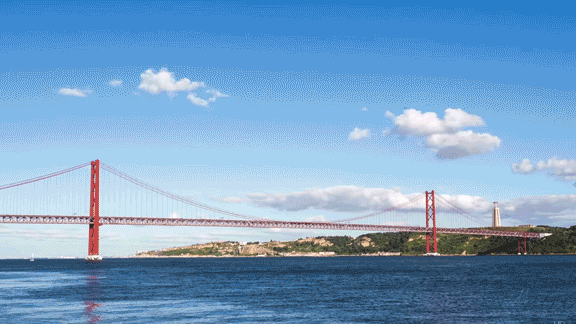
Example Nº3 - 25 DE ABRIL BRIDGE HYPERLAPSE
Gear: Canon 6D - Manfrotto 190- Canon 17-40 f/4L - Twin 1 ISR Intervalometer
Planning: The longest Hyperlapse I've ever made yet. This was around 2 Km, and as the bridge is huge, I needed to move a lot to get a beautiful Hyperlpase.
Shoot: When I arrived at the location I saw a very long pedestrian path that goes all the way down and below the bridge. The problem, in this case, was the people, so many walking and enjoying the view from this spectacular path, I decided to risk it anyway, cos it was definitely worth it! I set my fixed point at top of the second tower of the bridge, set my monopod and began shooting with an interval of 8sec, there wasn't any pattern on the ground so, I set the distance between shoots by making a long step, about 50/60cm. While shooting I had to ask people politely if they could let me pass. After 1 hour and 40 minutes and 550 pics, I arrived at my destination.
The camera settings were f/8 - 1/250 - 100 ISO - Raw - All Manual
I really hope this tutorial help and inspire you to start doing more Hyperlapse.
If you have any questions regarding this tutorial, feel free to ask me anything by leaving a comment below or through my social media.
Don't forget to say hi on my Instagram Account and subscribe to my YouTube channel!
I'll see you in the next post!
Thanks for reading!